We would definitely be millionaires if we got a penny every time somebody asked us about our photography or travel essentials. Now I know some people can’t help pack a large suitcase (or two?) even for a weekend break while there are others who don’t blink an eyelid at the thought of exploring dozens of continents just with a backpack and a teeny weenie digital camera. Savi and I meet them both somewhere in the middle.
Over the years, we have developed a distinct travelling style – both of us like travelling light, looking half decent while exploring new places, sampling local food and meeting local people, and capturing moments and experiences on a good camera. Some people might find it cumbersome to lug around a heavy DSLR on their travels but it occupies pride of place in my travel bag.
So what are you waiting for? Just click on the arrows, expand the section you’d like to read below, and tell us in the comments at the end of the post if there’s anything else you’d like to know 🙂
[learn_more caption=”THE Camera and Lenses – Nikon”]
I have always been keen on capturing moments through my camera, but this interest turned into a passion when we were gifted a Nikon D80 DSLR camera – this was six years ago and as they say there has been no looking back.Up until a year ago, I practiced the basics on the entry-level Nikon D80 and only then decided to invest in a full-frame DSLR camera – the Nikon D610. No prizes for guessing I’m a Nikon fan :).
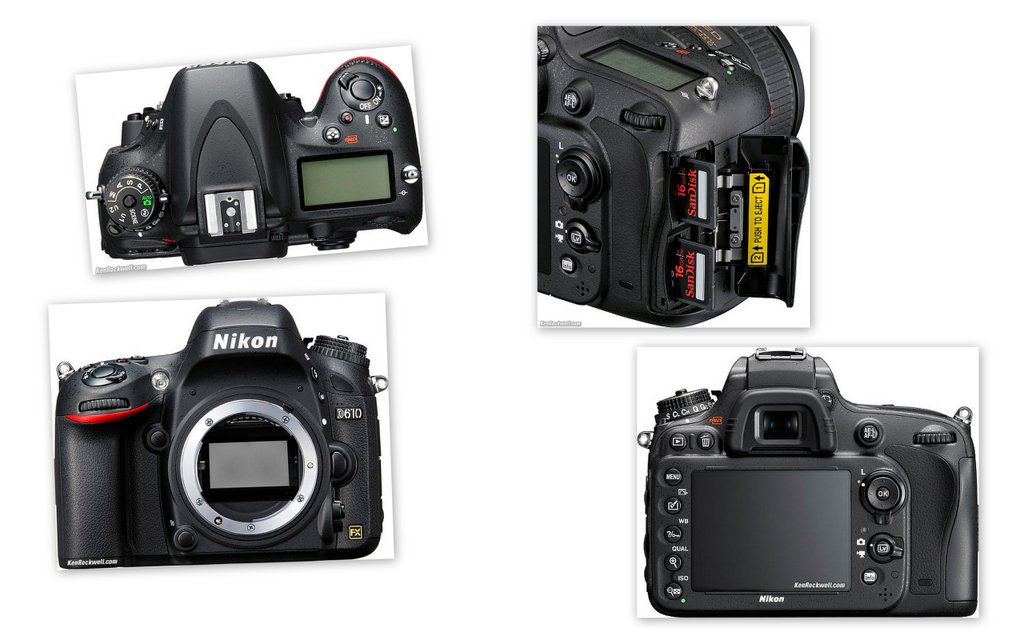
Although technically the full-frame D610 offers many benefits over the D80, in layman terms it just produces better image quality, larger images, and most of all, really good low-light performance. I love the fact that the D610 comes with 2 memory card slots so if you click in RAW, it’s easier to have RAW files in one card and JPEGs in the other. The 24 megapixel sensor means that the images are massive in size, so hard disks can fill up rather quickly ;-). The biggest addition for us (especially after we started the blog) has been the capability for recording HD quality videos – we tried it out in Iceland and loved the results. It’s only natural that as technology advances, cameras and image sensors get better and undoubtedly the quality and features offered by the cameras produced in 2013 (D610) will be much better than those developed in 2006 (D80).
All in all, the D610 is an excellent camera for amateurs and semi-professionals (even professionals I’d say), is easy to handle and offers better battery life than my old D80. The only negative for me so far has been the weight – it’s much heavier than my D80 and it took me a while to get used to the added weight.
Price: £1,389 on Amazon as of August 2014. You can purchase it here
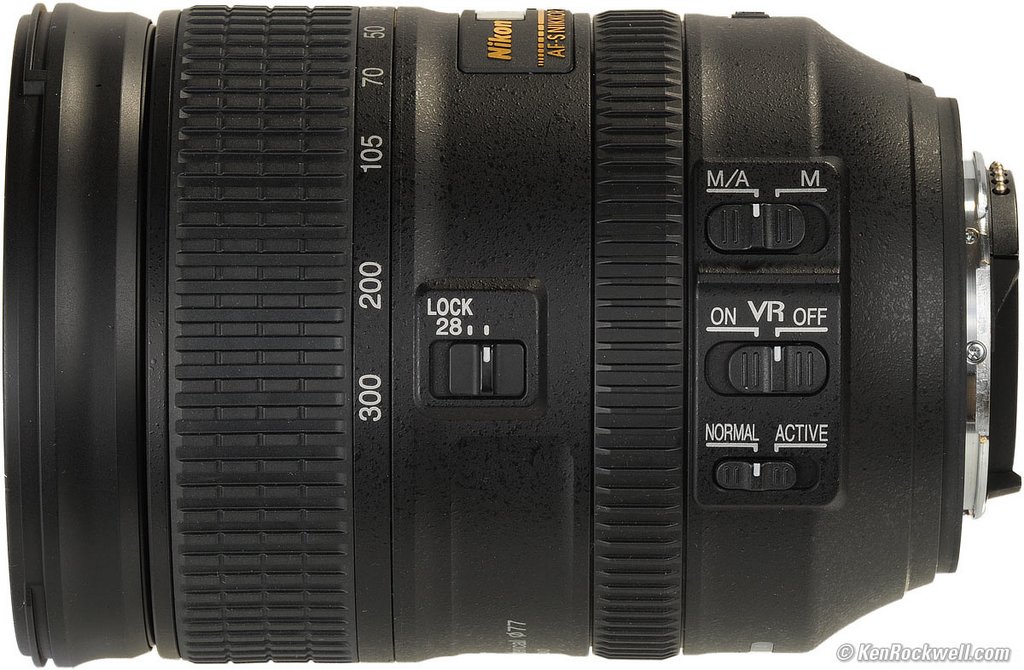
A lot of people ask me what camera I use – I usually tell them that they should ask me what lenses I have. In my opinion, lenses play a much bigger role in the image quality (of course the photographer’s eye and skills matter the most but let’s leave that for another article shall we?). There are tons of lenses out there in the market that can break one’s bank. A part of me would love to have a couple of those lenses but I prefer travelling light over lugging an array of heavy professional lenses around. The Nikon 28-300mm F3.5-F5.6 VR is the lens of my choice – it gives me the versatility and zoom range so that I don’t have to keep changing lenses. This really helps me capture images that I might have missed in the time I would have taken to change lenses. Needless to say, this versatility comes at a price – the image quality, although really good, is still not as good as some other high end lenses can produce. The other thing I don’t like about this lens is the weight – almost 1 kg – eek!
If you prefer to carry minimum number of lenses yet want flexibility and versatility when you are out and about on your travels, go for this lens.
Price: £680 on Amazon as of August 2014. You can purchase it here
The lens I carry (and swear by!) for portraits is the Nikon 50mm f1.8 G. Why do I love it so? It’s super light, cheap, and produces excellent images, especially portraits in low-light situations. It’s amazing when used indoors say in museums, churches, and parties at night. That said, I love to use it for landscapes too – it brings out the colours and details brilliantly.
This is one lens that should be in every photographer’s camera bag – I can’t fault it in any way whatsoever 🙂

Price: £149 on Amazon as of August 2014. You can purchase it here
When we quit our jobs in 2015 to travel full-time, I bought a wide angle lens. With the 28-300mm that I had, I would often feel limited when it came to small focal lengths, especially for shooting buildings and landscapes. So after a lot of consideration and dilemma, I decided to get the Nikon 18-35mm f3.5:4.5g. The reasons I chose this over other more professional wide angle lenses were its weight and cost.
Price: £549 on Amazon as of May 2016. You can purchase it here.
Finally, my latest favourite lens has to be the Tamron 24-70 f2.8. It’s perfect for portraits, street, and landscape photography. The constant wide aperture is a god-send for a good bokeh (useful in portrait photography) and the Tamron build-quality is amazing. What’s more, it’s almost half the price of the equivalent lens from Nikon even though the Nikon version does not have Vibration Reduction. All in all, a great lens for travel photography, albeit a bit on the heavier side.
Price: £679 on Amazon as of May 2016. You can purchase it here.
I could not have been happier with my camera gear – of course, there is no limit to enhance one’s professional photography gear, but I don’t see myself lugging more weight than I already do at least for the next couple of years :). The features in the new D610 are amazing and really aid a photographer in getting the best out of a situation. The two lenses work perfectly together too.
Leave me a comment if you’d like a more detailed review of my camera and lenses. In the meantime if you’d like to read some expert advice, I’d suggest going through Ken Rockwell’s website – his website has everything you could possibly want to read about Nikon cameras and lenses.
[/learn_more]
[learn_more caption=”The Miraculous Tripod – Manfrotto”]
Who doesn’t like photographing cascading waterfalls or iconic landmarks when they’re all lit at night? When I started using my first DSLR, I discarded the thought of owning a tripod for it was more weight to carry on our travels. I’d always look for a “stable” surface to place my camera in order to get a picture at night or a picture of both of us like this one:

A few years later, I gave in and bought a cheap tripod from Amazon. I’d always read experts saying the more you invest in a tripod the better value you get. They certainly knew what they were talking about – the cheap tripod was cumbersome to carry and couldn’t really bear the weight of my heavy D610 and the Nikon 28-300mm lens.
So I finally caved in and got the tripod that I had been lusting after for a while – Manfrotto BeFree travel tripod. It’s perfect for my needs because it folds down to 40cm, is super light from tripod standards, and can hold a weight of up to 4Kgs. This means we can even carry it in our hand luggage. Manfrotto’s higher end tripods are better but the BeFree offers the best compromise between price and benefits for someone who travels a lot. It’s compact, sturdy, well designed, and comes in a really smart nylon bag.

The BeFree comes with a ball head so it’s really easy to fix your camera in any position you wish – this is a big advantage over the previous tripod that I owned. Ball heads can be expensive but are totally worth the money. In case of BeFree, it’s included with the tripod. Another great feature of BeFree is that it comes with 3 locking positions for the legs – one for free form, one to hold it upright, and the last one for the low stance so that the camera can be positioned really close to the ground in order to get low-angle shots.
There are a couple of things that are missing when compared to higher-end tripods. A handle to move the camera without touching it (comes in handy when shooting videos) and a spirit level to determine if the tripod is erected properly or not. I haven’t missed these 2 features yet, but let’s see.
All in all, it fits my needs perfectly – easy and stylish to lug around and super sturdy for camera gear that is not heavier than 4 Kgs. You can see more pictures of the tripod and of the landmarks that I clicked using the tripod in the gallery below:
[tabs slidertype=”images” auto=”yes” autospeed=”3000″] [imagetab width=”” height=””]https://www.bruisedpassports.com/wp-content/uploads/2014/08/Manfrotto-BeFree-2.jpg[/imagetab] [imagetab width=”” height=””]https://www.bruisedpassports.com/wp-content/uploads/2014/08/Manfrotto-BeFree-3.jpg[/imagetab] [imagetab width=”” height=””]https://www.bruisedpassports.com/wp-content/uploads/2014/08/Manfrotto-BeFree-5.jpg[/imagetab] [imagetab width=”” height=””]https://www.bruisedpassports.com/wp-content/uploads/2014/08/Manfrotto-BeFree-6.jpg[/imagetab] [imagetab width=”” height=””]https://www.bruisedpassports.com/wp-content/uploads/2014/08/Manfrotto-BeFree-9.jpg[/imagetab] [imagetab width=”” height=””]https://www.bruisedpassports.com/wp-content/uploads/2014/08/Manfrotto-BeFree-7.jpg[/imagetab] [imagetab width=”” height=””]https://www.bruisedpassports.com/wp-content/uploads/2014/08/Manfrotto-B.jpg[/imagetab] [/tabs]
Price: £120 on Amazon as of August 2014 and can be bought from here
[/learn_more]
[learn_more caption=”The Compact Camera Bag – Manfrotto”]
Over the years, I have tried many camera bags to fit my kit. I started with a shoulder bag – small but big enough to fit my D80 and 1 lens. As a new camera and more lenses made their way into my kit, I got a backpack that would hold my D610, 2 lenses, flash, laptop, and all other accessories. Although good for long trips, it’s cumbersome to carry a padded backpack for short trips or day trips or an evening out shooting in London. So I decided to get a shoulder bag again. At the moment I have the Manfrotto Advanced Shoulder Bag VI (it ranges from I-VIII) and it’s just right for my Nikon D610 and the 2 lenses.

The bag is small (roughly 19cm (H) x 23cm (W) x 15cm (D)), smart, really light and well padded with adjustable inner “compartments” to keep your camera and lens the way you wish. There are plenty of small pockets and holders for keeping smaller things like filters, pens, passports, mobile phone, and perhaps a battery charger. It comes with a weather proof cover should it start tipping down when walking around (VERY common in London). It has come in really handy for our day trips in and around London as well as short trips to other European cities. At home and on longer trips, I’d still take the backpack since any shoulder bag will have a limited space.
A point to remember – Manfrotto’s website states that this bag can carry a Pro-DSLR with a zoom lens attached and 2-3 additional lenses. I must warn you that this is not correct – at best it can carry a Pro-DSLR with a zoom lens attached, an additional lens, and a flash.
You can see more pictures of the bag in the gallery below:
[tabs slidertype=”images” auto=”yes” autospeed=”3000″] [imagetab width=”” height=””]https://www.bruisedpassports.com/wp-content/uploads/2014/08/Manfrotto-A.jpg[/imagetab] [imagetab width=”” height=””]https://www.bruisedpassports.com/wp-content/uploads/2014/08/Manfrotto-AS-2.jpg[/imagetab] [imagetab width=”” height=””]https://www.bruisedpassports.com/wp-content/uploads/2014/08/Manfrotto-AS-3.jpg[/imagetab] [/tabs]
Price: £45 on Amazon as of August 2014 and you can purchase it here.
[/learn_more]
[learn_more caption=”The Camera Cleaning Edition – Lenspen”]
For the five years I had my Nikon D80, I had never bothered to clean its sensor. The maximum I used to do was just use a blower to blow the loose dust away and occasionally wipe my lenses clean. You can imagine the plight of the kit when I sold it a year ago.
When I invested such a big sum in my new camera and lenses, I knew I’d have to take extra care to keep the kit clean. I got two cleaning kits from Lenspen right away – the DSLR Pro kit and the SensorKlear Loupe kit.
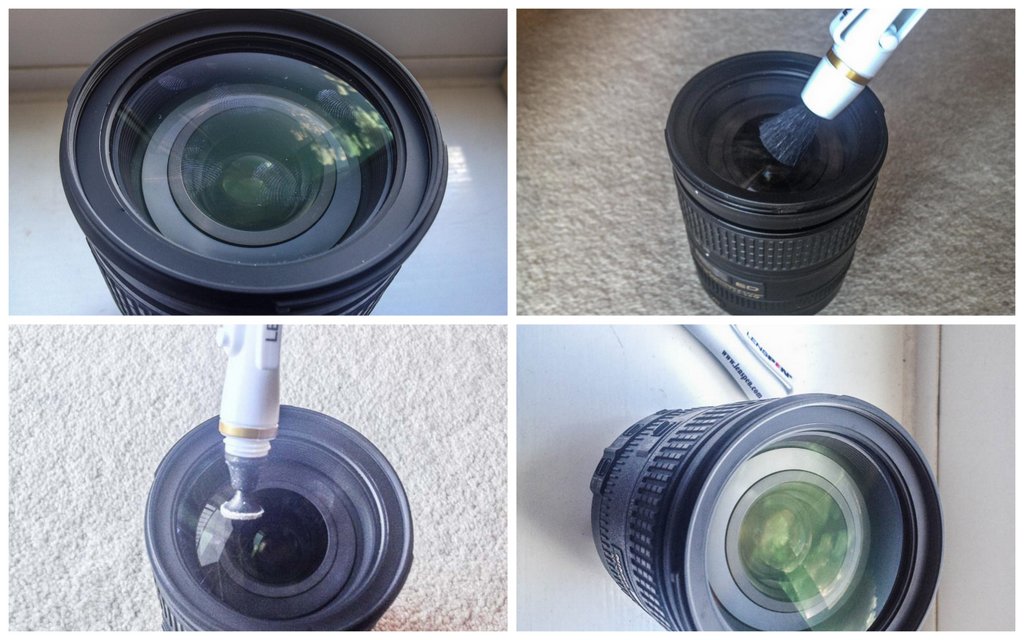
The DSLR Pro kit is a collection of 3 “pens” that can be used to clean the Lens, filters, and the viewfinder of any dust or smudges. I’m a bit obsessive when it comes to keeping my new kit shining for as long as possible and the Lenspen has come in quite handy for cleaning my lens. The Lenspen has a brush at one end that you can use to get rid of loose dust on the lens glass and a non-liquid cleaning element at the other end that gets rid of stubborn fingerprints and smudges. The MicroPro (smallest of the 3 pens) that is used to clean the view finder is a god send because my view finder is perpetually smudgy and I always ha trouble cleaning it. I don’t use any filters on my lenses so haven’t had the chance to try the 3rd pen.
The SensorKlear Loupe kit is quite an interesting innovation – it comes with a Loupe that you can use to look into the sensor to see what exactly you are cleaning instead of just blindly swiping the sensor with wet swabs. I was a bit of apprehensive of using the “wet cleaning” method (although it can be very effective if done properly but I don’t think I’m there yet), so the dry cleaning approach of the SensorKlear Loupe suits me well.
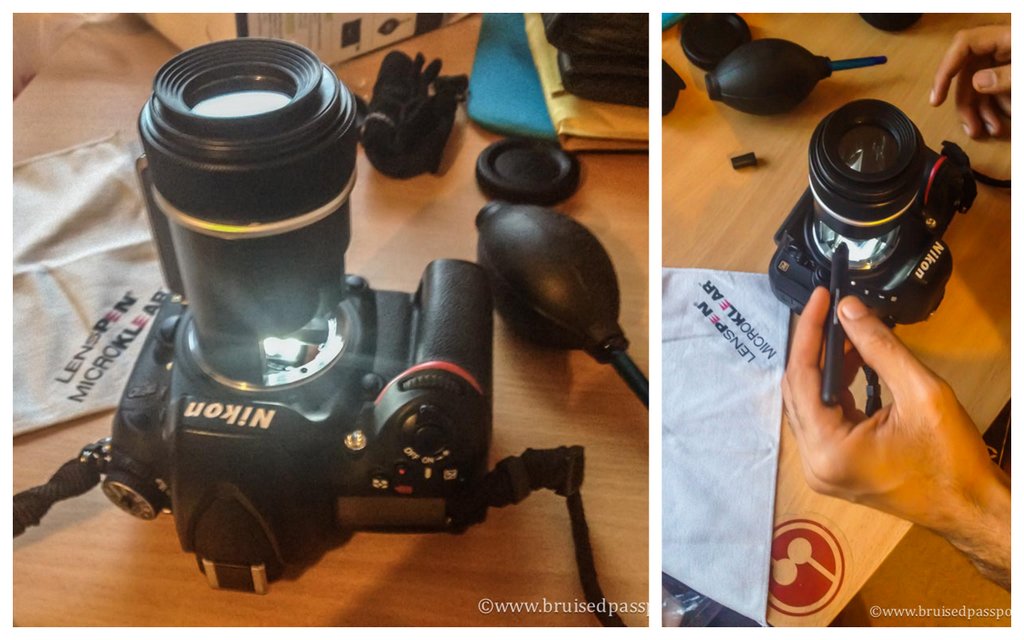
I’ll be honest – I was shitting in my pants the first time I used the kit, but I got more comfortable as I got the hang of it. You basically spot the dust through the Loupe (which provides a magnified and lit view of the sensor) and then try to get rid of the loose dust using the hurricane blower. If stubborn dust still remains, you can use the SensorKlear pen that can reach the sensor via an opening in the Loupe so that you can see exactly where you are touching your sensor. Using the pen, you can dislodge the stubborn dust particles and then blow them away using the blower. No liquids involved – I’ll leave the wet cleaning to the experts when I give my camera for a professional clean in a while.
Overall I’m quite impressed with the cleaning kits but I’d recommend trying the Loupe on something else first just to get a hang of getting the cleaning pen through the opening and manoeuvring it whilst looking through the Loupe. I personally struggled with that in the beginning 🙂
You can see some more pictures of my cleaning kit in the gallery:
[tabs slidertype=”images” auto=”yes” autospeed=”3000″] [imagetab width=”” height=””]https://www.bruisedpassports.com/wp-content/uploads/2014/08/Lenspen-1.jpg[/imagetab] [imagetab width=”” height=””]https://www.bruisedpassports.com/wp-content/uploads/2014/08/Lenspen-3.jpg[/imagetab] [/tabs]
Price: DSLR Pro Kit – £28 and SensorKlear Loupe Kit – £39 on Amazon as of August 2014. You can purchase them here and here respectively.
[/learn_more]
[learn_more caption=”The Crazy Action Camera – GoPro and gimbal (stabiliser)”]
If you read Bruised Passports regularly, you must know by now that we LOVE road trips. We have driven in close to 25 countries and feel that there is no better way to explore a country than driving through it. We’d always wanted to capture our scenic drives but the DSLR wasn’t up to the task in this case. Enter GoPro – a camera smaller than the palm of your hand and excellent at capturing drives, adventure sports, or deep-sea dives. It comes in a waterproof casing so if you love diving, you can easily capture the amazing sea life.

For us, the best use of the GoPro has been filming our road trips – we took it underwater in Mauritius, attached it our car in Switzerland, and went hiking on a glacier with it in Iceland. It’s amazing for getting footage that we could not have dreamed of getting with a regular camera. In Iceland, we mounted it on the bonnet of our car and off we went. Even 150 Km/hr winds could not prevent the tiny camera from recording crystal clear videos of our road trips. Our latest GoPro (Hero 4 Silver) has an LCD screen for you to see what you are recording. In addition to that, the GoPro it has built-in wifi which enables you to operate it from your smartphone so you can see what exactly is being recorded– how cool is that?
Here’s a video for you to enjoy:
Price: GoPro Hero4 Silver Edition is for £275 as of May 2016 and you can purchase it here.
In recording Vlog style videos we noticed that our GoPro footage was shaky simply because we would be recording whilst walking. After some research online, we discovered a gadget called a Gimbal that can be used to stabilise a GoPro (or for that matter a mobile phone) along all 3 axes. We decided to give it a go and it made a world of a difference to the quality of our videos, especially the ones that were recorded whilst moving. A lot of video making techniques like panning became so easy with the gimbal. We ordered the G4 3-Axis Handheld Steady gimbal from a Chinese company called Feiyu Tech and haven’t regretted the decision at all.

Price: £169 as of May 2016. You can purchase it here.
[/learn_more]
FURTHER READING
If you’re interested in finding out more about how to improve your photography, have a look at our articles about Laurence’s landscape photography tutorial and Elia Locardi’s Landscape Photography tutorial. Both have excellent tips!
Want to know more about us? Here’s an introduction 🙂
Read all our stories from around the world in our compilation of Amazing Experiences
If you have any questions or would like more details, please let us know in the comments below or send as an email 🙂 Hearing from you guys makes us super happy !


I have that same 50 mm, but I’ve not pulled it out in a while opting for my 35 mm as more of an all-purpose lens. I’ll have to look into the 28-300 when I’m feeling like spending some more money.
The 28-300 is an amazing lens Leah – buy it. I can’t help being an enabler 😉
We’re stricly one-lens photographers. Looks like we’re going to have to invest in another lens, doesn’t it? Thanks for the tips.
That portrait lens is incredible for the price – you’ll really enjoy it 🙂 Which lens do you use?
It’s amazing that you are able to travel and share your travel tales. Though I’d really love to travel like you guys, it’s always finding a moderately good hotel and landing up and then looking up the sights. Guess age does that to one. Anyway I do find your posts very enjoyable and am able to see such a lot through your lenses! Great keep it up and the stories going.
Thank you so much Raj ! Your message made our day 🙂 Landing up at a place and then deciding what to see has its own charm – we do it from time to time too 🙂
We have a Nikon D7000 and are pretty amateur when it comes to photography. We have the basic kit lens but I’m not a big fan of that. We have a trip coming up next month to Morocco and Tanzania safari and are looking into buying a new lens so this post really helps! I’ve been thinking of buying the Nikon 50mm but because it doesn’t have zoom, I wasn’t sure if it would be a good lens for our trip. What do you think? Any suggestions?!
Hey Naima,
Sorry for the late reply. For the safari, you will definitely need a good zoom lens. What’s your kit lens ?
A portrait lens like 50mm won’t replace your zoom, it will just be an additional lens. It will definitely help you get amazing shots on the souks of Morocco and also in low-light. For D7000, I’ll suggest the 35mm – it’s around £150 and I had it for 4 years with my D80. Got some of my best shots with the 35mm in Marrakech and other places too. Go for it 🙂
Got the Cabin Max myself and I have to say, its worth its price. I didn’t last longer than one trip around Europe and the zips are already falling apart. Would advice to invest into more robust suitcase with good quality execution to last for more trips if you are traveling a lot.
Hey Jonathan, we travel far too frequently to use a collapsible suitcase as our main suitcase. But we really like using Cabin Max’s Europe as a backup bag for extra shopping/emergencies as we mentioned in the article 🙂
Amazing trip tales you guys share. You guys can make any place worth visiting. Awesome.
Thanks a million Anoop – it’s always a pleasure to see a comment from you in our news feed 🙂
Very useful informations.
Glad you found it useful Kunal 😀
Best article I have read for travel photography so far. As a photographer and a travel buff myself this really helps especially to keep in mind what all you should actually carry while travelling. I usually do not carry tripod, was thinking of purchasing a monopod since a long time. But the tripod you have mentioned has caught my eye now. :). Cheers from one nikon fan to another. I recently bought my nikon d810 and cannot wait to explore it on my next travel adventure. 50mm is my favourite too. I have been trying 24-120 and amazing results with full frame. Great article 🙂
Thanks a lot Mona and congrats on the new camera – it’s one of the best out there 🙂
A tripod is a MUST if you want to capture great landscape photos.
Cheers
Vid
“Akureyri” is spelled wrong 🙂
Will correct it now – thanks for pointing it out 🙂
I just love your blog posts.
You guys don’t use iPhone for photography?
We rarely use the iphone Tanayesh – it’s usually our DSLR 🙂
Hi,
I love night photography and landscapes. I use Canon 700D, what lens do you suggest? I have been recommended 24mm fixed lens. Any thoughts?
Hey Kanika,
From what I know, 700D is not a full frame camera, so 24mm is actually going to be roughly 36mm which is not ideal for night photography (especially stars). You should try and buy a lens which lets you go wider than 24mm/36mm.
You have just made me plan my next trip! But i’m going with a baby on board. Your blog had a lot of life! I really enjoyed reading it. Cant wait to see all myself.
Dear Maha, we hope you have an awesome trip and we wish you safe travels with your baby. We are happy that you liked reading our post:) 🙂
Just the kind of information one needs to decide on his photography gear.
You guys are just amazing.
Thanks Diganta for appreciating the effort that we put in to make this post possible 🙂
Great article! Your photos are so beautiful, do you use any filters? Also do you do post production on photos, can you recommend any app?
Hey Sherry – we don’t use any filters. I click RAW photos and edit in Lightroom 🙂
How do you trigger your tripod? I have a D610 as well with a Tripod but never tried that!! I just wanna know what remote you use? Do you use a Wifi transmitter to transfer your pics to laptop or just insert your memory card in the laptop and transfer?
Hey Sujana,
I use the Nikon ML-l3 remote. No, I don’t transfer pics using the additional wireless transmitter. If the D610 had built-in WiFi capabilities like the D750 I might have transferred over WiFi but at the moment I don’t 🙂 I insert my memory card in the laptop and transfer.
Hey Savi/Vid,
Trust you guys are well and doing great.
Me and my wife we love your work and gets inspired with every post of yours 🙂 same story – Friends, love and finally we got married on 14th Feb, 2017. Photography is my Hobby and love to capture our precious moments.
Currently I’m using Sony Alpha any suggestions for portrait shoots.
Tons of thanks once again for such beautiful stories and pictures.
Hey Abhi – Great hearing from you. More than a particular camera, I enjoy using a 50mm lens for portrait shoots. Hope that helps. Cheers
Hey Vid ,
Which clamp mount you are using for your Gopro ? I’m not able to find that information above or may be I missed it ? Please do let me know.
It’s the jaws flex clamp 🙂
Hi Savi/ Vid,
We are planning for a Trip to Bali. what lens do you recommend for temple photos and Beach? Can 35 mm prime lens suffice landscape and Portrait? Or any other lens you suggest?
Hi Bhushan,
Would suggest taking a wide angle lens too, especially for landscape and architecture!
Hi Savi/ Vid,
We are planning a trip to Bali . I am planning to carry only 35 mm Prime Lens. Is that ok for temples and a few landsacpes photography?
Or do you suggest some others?
I’d say take a wide angle too 🙂
Hi Vid.
I have a Nikon 3200D with the 18-55mm kit lens. I plan to buy a wide angle lens for shooting auroras. Could you suggest one. I read in some blog about Nikon 14-24mm f/2.8G AF-S ED. Also since this is a costly lens, how do you suggest we rent a lens from Tapprs? Do you have any other lens renting websites to recommend
Hi Laxmi,
That lens is not a very good option on your cropped sensor as the effective focal length will be 21-36mm. I am not aware of rental options.
You should look at Tamron or Sigma wide angle lenses for Nikon 🙂
Very useful information. Great stuff on your blog and love your Instagram! What do you use to capture the birds eye view? Some kinda drone?
Hello yes 🙂
So good to read all the stories of yours, I was curious to know that which drone you use for capturing such stunning moments, I read in one of your post that it was Parrot beepop2 but it was in 2017. So any upgrades you did ? Please name the make and model 🙂
Hey Vineet yes – I upgraded to a DJI Mavic Air a while back and love it
Hi.. love your feed and all the details you guys share.. really helpful.
Are you still using Nikon d610 or you upgraded that as well?
Hey Ankur – thanks a ton. I used it till it literally gave way and upgraded to a Sony A7C just a year or so ago 🙂
Hi
I have a Nikon D750. When doing landscape photography involving scenary, mountains or buildings of interest, I like to capture it with a subject (one of the travelling team|) so that my landscape photo doesn’t become a postcard. Which lens should I use to get the person and the landscape background perfectly sharp. I am not a expert photographer and always use the presets for shooting. I usually end up in a bokeh which everyone would die for but I hate.
Hi Sridhar
More than the lens it’s the aperture that will determine what you’re after. You should be shooting between f8 and f11 (I usually prefer f8/f9). Also, keep some distance between yourself and the subject (and don’t zoom in, as that will start giving you the bokeh effect). Use a lens on 24mm, f9, and try shoot from a distance to get the landscape and the subject. Experiment with that. Let me know how it goes 🙂
Thanks for sharing the informative article.
“Considering diving into travel photography soon! Any recommendations on must-have essentials for capturing those unforgettable moments on the go? Any pro tips or favorite gadgets that seasoned photographers swear by? Excited to elevate my travel photography game!”